Ripple20 – Control Vulnerable Devices by CVE Correlation
Whether you opt to use Genians Device Platform as a way to check for Ripple20 devices or the CVE list as demonstrated in this blog, the ability to rapidly deploy a Genian NAC physical or virtual Sensor, group and tag affected nodes on the network and fully automate notifications via any number of collaborative tools is a huge time saver.
In a recent blog post, Ripple20 – Detect and Isolate Vulnerable Devices at Risk, we discussed the background and effects of Ripple20 along with a mitigation approach using Genian NAC to identify vulnerable devices on the network by Platform type. Using affected Cisco devices as an example, we demonstrated how to quickly and easily identify vulnerable devices on the network. Today, we will cover how to identify the devices by CVE correlation.
The goal will be similar to the goal defined in the last blog. Identify vulnerable devices, group them together, restrict or modify permissions (if desired) and automatically notify Admins. The difference is we will be grouping them by CVE, not by Platform type. Let’s start with the first step – Identify.
Step 1: Identify Nodes by CVE
Leveraging Genians Device Platform Intelligence, a Genian NAC Sensor can be deployed on the network rapidly to non-intrusively identify all IP-enabled devices on a network. Sensors can be deployed as intel-based hardware, virtual instances or even utilizing the recently added Windows Sensor Agent Plugin which allows a Windows machine to act as a Sensor. Whichever method is chosen, it will quickly identify all devices on the network and display them in the UI.
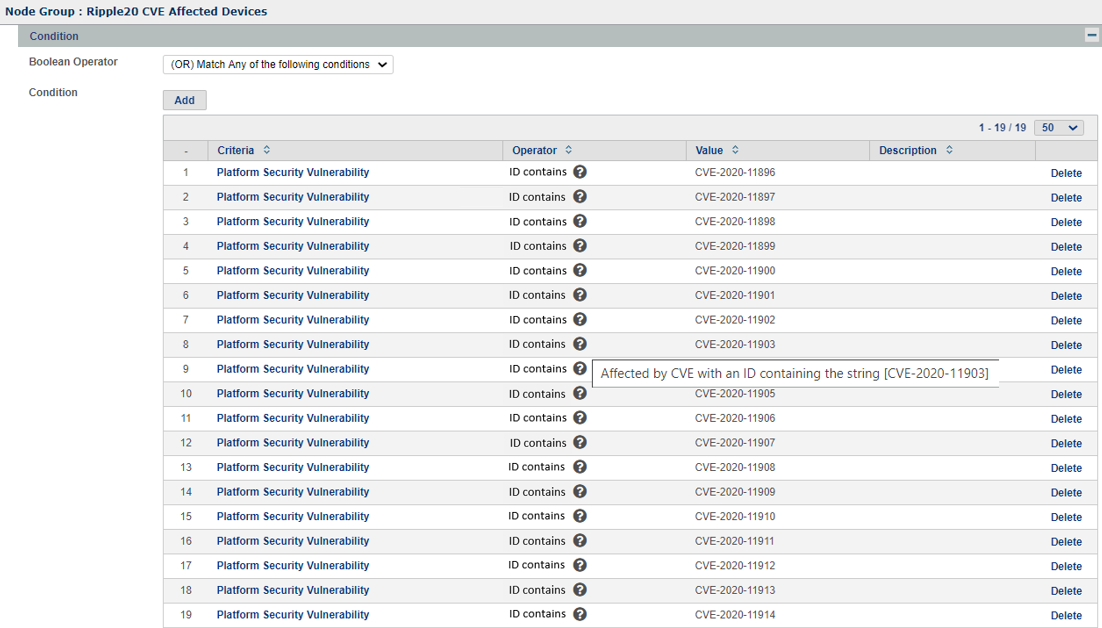
To identify these devices, we will create a Node Group and Enforcement Policy in the Genian NAC UI. The Node Group will list the 19 Ripple20 CVEs and the Enforcement Policy will allow for options later on for isolating or restricting the devices. In this example, as in the previous blog post, we will not restrict permissions since we are just auditing to locate vulnerable devices.
Ripple20 CVE Node Group
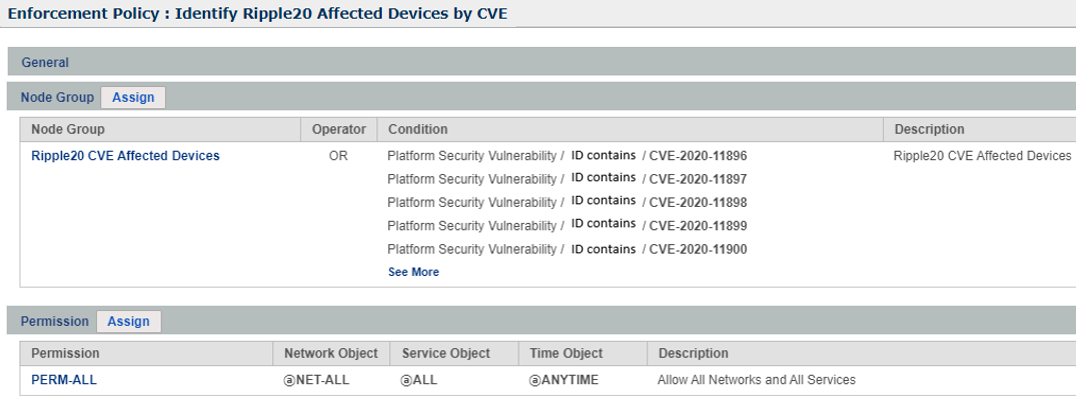
Ripple20 CVE Enforcement Policy
Once configured, we can see the Enforcement Policy has already matched on 2 nodes that are present on this network.
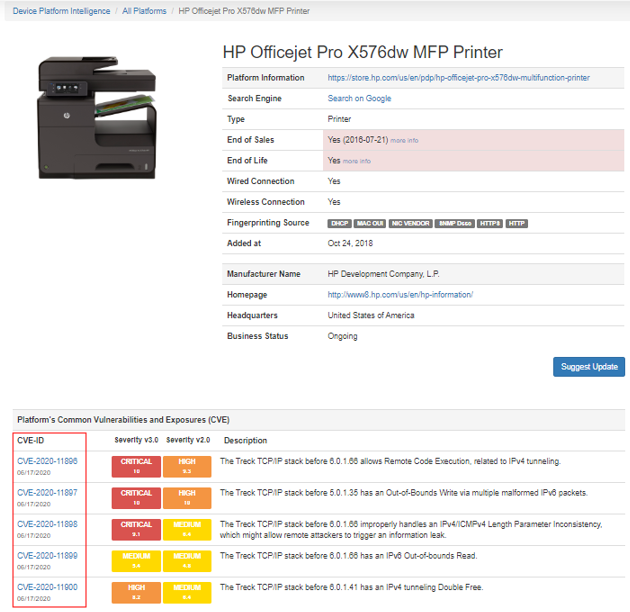
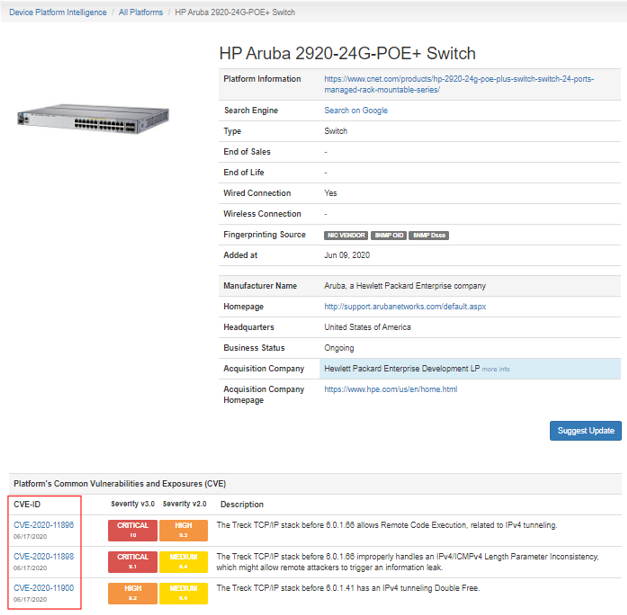
By clicking on the Platform links in the node list above, we can examine the Device Platform Intelligence details for each Platform type including CVE linkage.
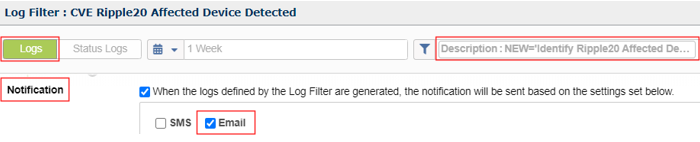
Step 2: Configure Notifications & Node Tagging
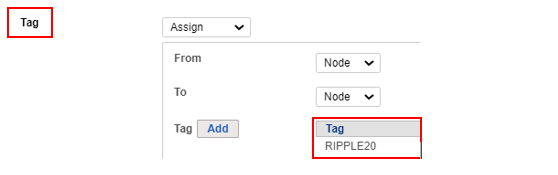
Next, we will configure a Log Filter. The Log Filter will serve a dual purpose. First, it will trigger notification options so Admins are aware that a vulnerable device is on the network. In this case we have enabled both an email option as well as a Slack option. Second, it will be used to dynamically assign a Node Tag to any node detected that matches the CVEs listed in the Node Group.
Notification
Webhook
Tag
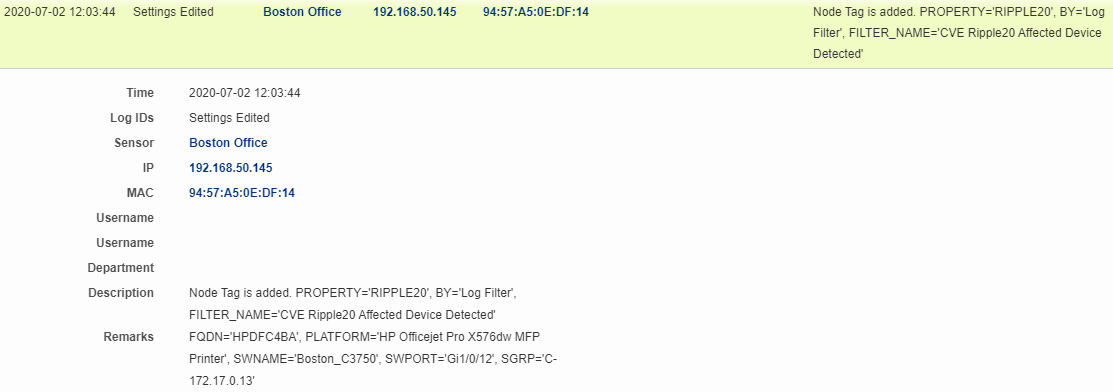
Step 3: Validate Node Tagging
Once the configurations are in place, a matching log entry similar to the example below will be posted. In this example, an HP printer has matched based on a linked CVE and this has triggered the assignment of a Ripple20 Node Tag. This Tag is one of the components that can be utilized by an Admin later to optionally restrict access for the device.
Reviewing the list of devices discovered by the Sensor and presented in the UI, we see that the two nodes matching on the Enforcement Policy were tagged with the Ripple20 Tag while other nodes, since they are not linked to the CVEs defined in the Node Group, were not tagged.
Step 4: Validate Notifications
Next, we will validate both forms of notifications. By checking the email account associated with the email notification option, we will find an alert email was received.
Utilizing the Genian NAC Webhook Integration for Slack, when we check the integrated Slack channel, we see that notifications are being received in Slack as well any time this event occurs.
Whether you opt to use the Device Platform as a way to check for Ripple20 devices or the CVE list as demonstrated above, the ability to rapidly deploy a Genian NAC physical or virtual Sensor, group and tag affected nodes on the network and fully automate notifications via any number of collaborative tools is a huge time saver.
Not sure where to start?
Run a 6-question Security Architecture Assessment and see where security enforcement should begin